Following this guide will get Flash Player for Firefox and other browsers that use it like Konqueror, Opera or Epiphany. Google Chrome comes with Flash integrated into the package it provides. Moreover, Google Chrome is the only supported browser to receive new versions of Flash on Linux, while the one provided by Adobe on their website for Firefox only gets security updates (e.g. the last Flash version in Chrome is 11.9 while while the last one which targets other browsers on Linux is 11.2).
This guide applies to Ubuntu 14.04 Trusty Tahr and Ubuntu 13.10 Saucy Salamander, however most of the information here should work for older releases too.
Method #1: Installing from the Repositories in Command-Line
For this method we will use the terminal. Follow the steps below:Step #1: Open the GNOME Terminal
To open the terminal, either press Ctrl+Alt+T or search for gnome-terminal in Dash and press Enter.
Step #2: Make sure the 'multiverse' section is enabled in repositories
Since Flash is not open-source software, it is included in the multiverse section of the repositories. This section should be enabled by default, however to make sure check the /etc/apt/sources.list file and search for a line that looks like this:
deb http://archive.ubuntu.com/ubuntu/ saucy main restricted universe multiverse
Notice that the multiverse section is specified. If it doesn't exist, add it to your sources.list file by
editing this file manually with root privileges (e.g. type sudo nano /etc/apt/sources.list, then
add the multiverse section, then press Ctrl+O followed by Enter to save it, and after that press Ctrl+X to exit the
Nano editor). Alternatively, see Method #2 below to enable multiverse graphically without editing anything
yourself. There is also a guide about repositories and installing software in Ubuntu you may want to check out,
located here.Step #3: Update the package list
To update the package list, just type the following command:
sudo apt-get update
Step #4: Install the Flash pluginNow, install Flash:
sudo apt-get install flashplugin-installer
Eventually restart Firefox if it is running.
The plugin will now be installed system-wide as /usr/lib/flashplugin-installer/libflashplayer.so.
Method #2: Installing from the Repositories in Ubuntu Software Center
The USC is the most common way to
install software graphically in Ubuntu, and the outcome is identical to what you would get if you would
install software from the official repositories using command-line. There are some other
GUI package managers out
there like Synaptic,
however they are not available by default. Here are the steps you need to install Flash from the Software Center:Step #1: Open Ubuntu Sofware Center
Open USC from the left launcher panel or by opening Dash (press the Super key, usually the Windows logo key) and typing ubuntu software center followed by Enter:


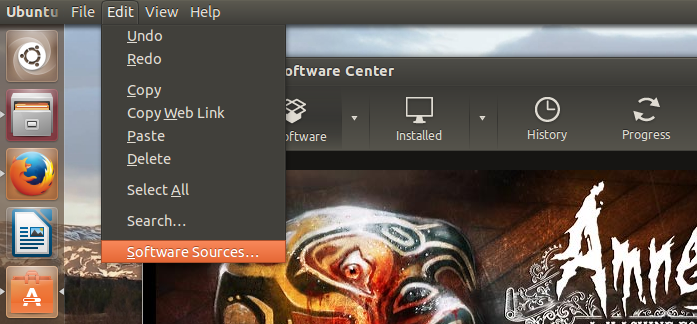
Once USC is running, go to Edit->Software Sources...:
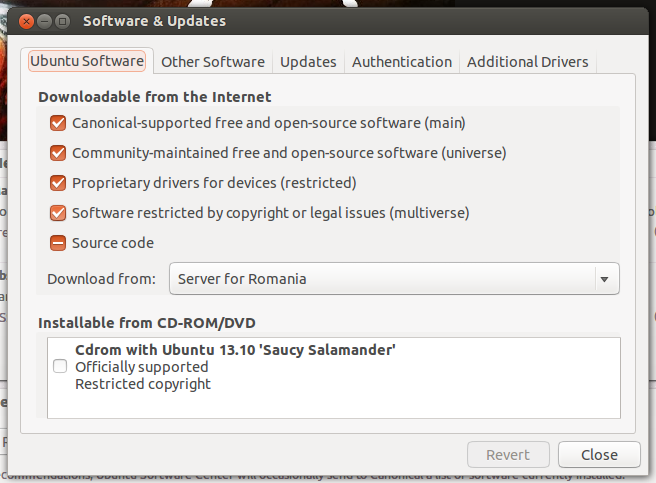
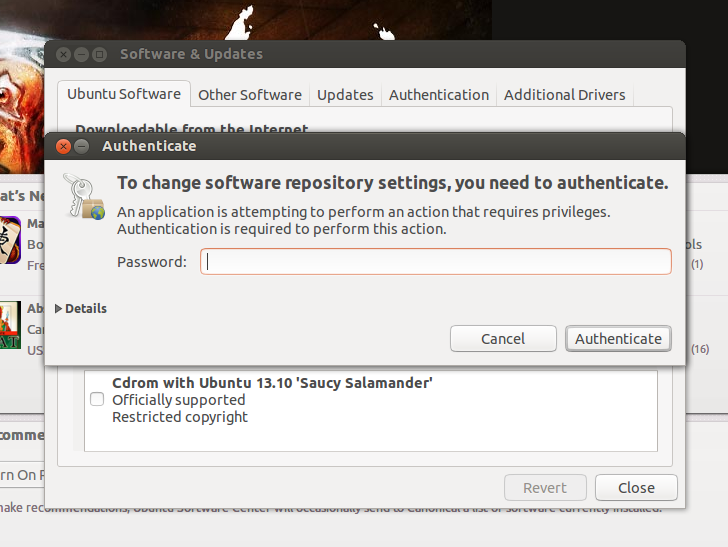
The package list will be automatically updated once you select the multiverse section and enter your password.
Step #4: Search for the Flash package
Search for flash plugin or just flash:
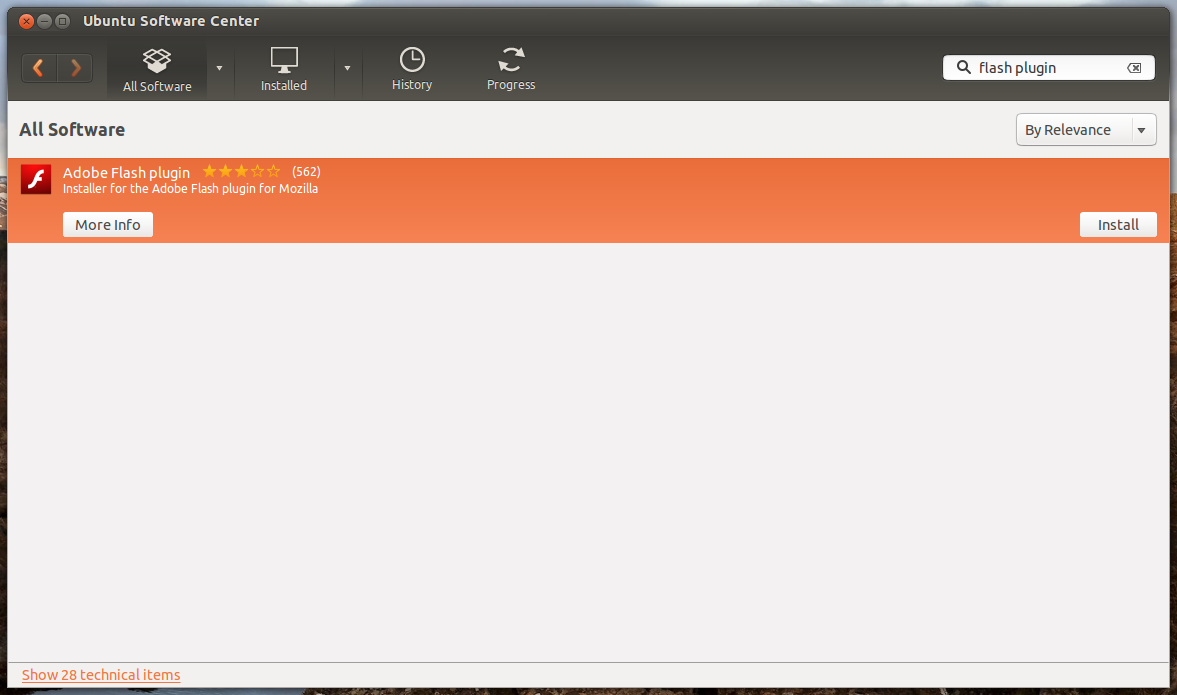
Click the Install button and wait for Flash to be installed. The plugin should be now properly installed. You may need to restart Firefox to use it.
Method #3: Install Adobe Flash Player Manually (.tar.gz Package)
This method will show you how to install the plugin manually, as normal user. So instead of using USC, you will
need to download the package from the official website and install it. Here are the steps:Step #1: Download the Flash package
Get the .tar.gz package from here and save it somewhere on your hard disk.
Step #2: Uncompress the package
Since .tar.gz files are compressed archives, we will need to uncompress it. Go to the directory where you saved the .tar.gz file (e.g. cd $HOME/Downloads) and type:
tar -xzf install_flash_player_11_linux.x86_64.tar.gz
You have to enter the correct filename, so replace the name with the one you have saved (for 32-bit,
the name may be called install_flash_player_11_linux.i386.tar.gz).Step #3: Install the Flash plugin
We will install the file manually. After you uncompress it, you will see the file called libflashplayer.so. Issue the following commands to copy this file manually in a location where Firefox can read it:
mkdir -p $HOME/.mozilla/plugins
cp libflashplayer.so $HOME/.mozilla/plugins
There is also an APT version in the drop-down list on the Flash website. This doesn't seem to work because the name of the package used for the apt: protocol mismatches the name of the package in the repositories.
Checking if Flash is Installed Correctly in Firefox
Open Firefox and either go to Add-ons->Plugins and see if Shockwave Flash is listed or press Ctrl+L and type
about:plugins in the address bar. If Shockwave Flash is listed there it means it is installed. Also check
the State row, if it is enabled it means that Flash is in use by Firefox.

Resources
This tutorial is based on this guide,
written a while ago for Ubuntu 11.04. This version updates it
for Ubuntu 14.04 Trusty Tahr and adds some more information regarding Flash on Linux.