This tutorial aims to include detailed explanations about installing software from the official repositories, PPAs, .deb packages, archived packages, shell or binary installers, source code, and even Windows applications that work with Wine. I will try to include real life examples for every different way of installing software. Both graphical and command-line ways will be explained.
Since this is a work in progress, the chapters will be published as I finish writing them, hoping that in the end everything regarding installing software will be covered. This tutorial will cover the following topics:
Part I: The Package Manager
- Introduction to the Debian Package Manager: APT and DPKG
- What Are Repositories?
- How to Add Repositories
- Useful APT Commands
Part 2: Installing Software in Ubuntu
- Installing Software from the Official Repositories
- Installing Software from PPAs
- Installing Software from Backports
- Installing .deb Files
- Installing Programs with a Shell or Binary Installer (.sh, .run, .bundle etc)
- Installing Programs from Archives (.tar.gz, .tar.bzip2, .zip etc)
- Using alien to Install RPM Packages
Part 3: Compiling and Installing Software from Source
- Prerequisites
- Compiling and Installing Software from Source
Part 4: Installing Windows Programs Using Wine
- What is Wine?
- Installing Windows Programs with Wine
The Package Manager
Introduction to the Debian Package Manager: APT and DPKG
Ubuntu is based on Debian, which in turn uses APT, the Advanced Packaging Tool, for installing software. Using APT is the default, recommended way of installing software in Ubuntu (and other Debian-based distributions for that matter, like Linux Mint). All the applications which can be installed this way reside in the so-called repositories, which are archives containing programs. There are thousands of such programs in the official Ubuntu repositories, and this includes music or movie players, image viewers and editors, web browsers, office suites and text editors, and a huge number of handy utilities, compilers, developer tools. APT uses DPKG, a low-level tool for taking care of installing and removing programs.
For now I will stick with the command-line interface, discussing the graphical interface tools that Ubuntu provides in the next chapter.
What Are Repositories?
Repositories are online archives which contain programs that can be installing using the package manager. Most of the applications included in the Ubuntu repositories are free, open-source and licensed under a permissive license like the GPL. All programs in the official repositories are tested and all dependencies needed for them to work are in place. When you install an application from the official repositories you don't have to worry about missing libraries or incompatibilities. On the other hand, this also has a small drawback: with few exceptions, the applications in the official repositories remain at the same version. This means that when a new version of a program appears you will have to use a PPA or the backports repositories (explanations on these included in the next chapter). There are a few exceptions from this rule, for example Firefox will always be updated to the latest version. Still, this shouldn't worry you since there are PPAs for pretty much all the popular applications out there, allowing you to install the latest versions available.
Ubuntu has four main repository categories, as follows:
- main - contains officially supported software
- restricted - contains officially supported software that is not available under a completely free license
- universe - contains community-maintained software (not officially supported)
- multiverse - contains software that is not free
$ apt-cache show amarok | grep Section
Section: universe/kde
$ apt-cache show acidrip | grep Section
Section: multiverse/graphics
You can search for packages at http://packages.ubuntu.com/, or browse packages for all Ubuntu versions here.
The file /etc/apt/sources.list has lines that start with deb and lines that may start with deb-src. The first ones are repositories for binary packages (software that you install), while the second ones are repositories to the source code packages. Everything after the # character is a comment and will be ignored.
You can read more about repositories on the Ubuntu Wiki, here.
How to Add Repositories
The list of repositories is located inside the /etc/apt/sources.list file. In addition to this, any file ending in .list from inside the /etc/apt/sources.list.d directory will also be checked for packages. You can add repositories by adding lines to the end of the /etc/apt/sources.list file, or create new files inside the /etc/apt/sources.list.d folder and add repositories there. You can either edit the /etc/apt/sources.list file manually with a text editor (in a terminal or with a graphical editor like Gedit) or you can use the Ubuntu Software Center for this. I will cover the USC part in the next chapter. For now, let's add a new line containing the packages for the 0 A.D. game, a strategy game for Linux, which has instructions for this on the official website. There are two ways of doing this, adding repositories manually or using the add-apt-repository command. We'll use the latter, so open a terminal and type in the following:
sudo add-apt-repository ppa:wfg/0ad
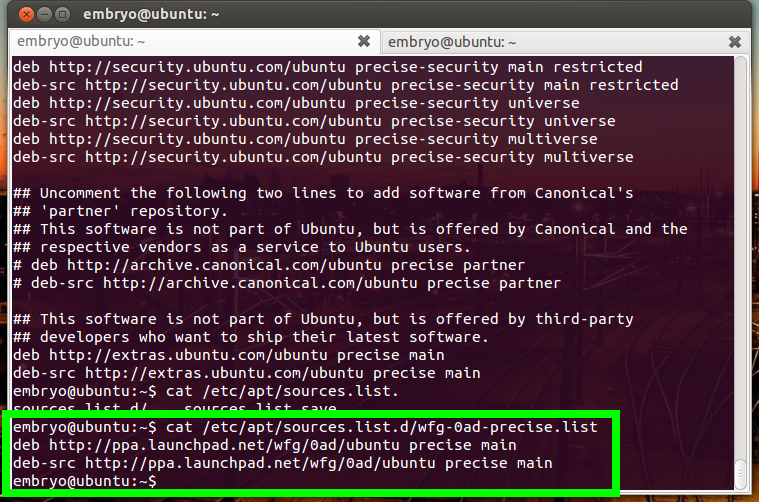
sudo apt-get update
sudo apt-get install 0ad
Useful APT and DPKG Commands
Show package info
apt-cache show package_name
Search for packages
apt-cache search pattern
Install a package
sudo apt-get install package_name
Remove a package
sudo apt-get remove package_name
sudo apt-get autoremove
List what files installed a certain package
dpkg -L package_name
$ dpkg -L irssi
/.
/etc
/etc/irssi.conf
/usr
/usr/bin
/usr/bin/botti
/usr/bin/irssi
...
Clean package archives
sudo apt-get clean
sudo apt-get autoclean
Update the packages list, upgrade the system
sudo apt-get update
sudo apt-get upgrade
Install source dependencies for a package
sudo apt-get build-dep package_name
Show the control file for a binary package
dpkg -f ubuntu_package.deb
List the contents of a .deb file
dpkg -c ubuntu_package.deb
Add an official CD or DVD ISO to the sources.list file
Enter these commands in your terminal:
sudo mount -o loop /path/to/image.iso /mnt/iso/
sudo ln -s /mnt/iso /media/apt
sudo apt-cdrom -d=/cdrom add
This is quite useful if you don't have an Internet connection but you do have the Ubuntu official ISO images.
Fix broken dependencies
sudo apt-get -f install
Fetch the source code for a package
apt-get source package_name
List all installed packages
dpkg --get-selections
See what files a package will install
For this you will first have to install apt-file (e.g. sudo apt-get install apt-file). Once it is installed, update the package list using apt-file update, and then use it like this:
apt-file show vorbis-tools
vorbis-tools: /usr/bin/ogg123
vorbis-tools: /usr/bin/oggdec
...
Installing Software in Ubuntu
There are several ways of installing applications in Ubuntu, each of them explained below.
Installing Software from the Official Repositories
Installing Software Using the Ubuntu Software Center
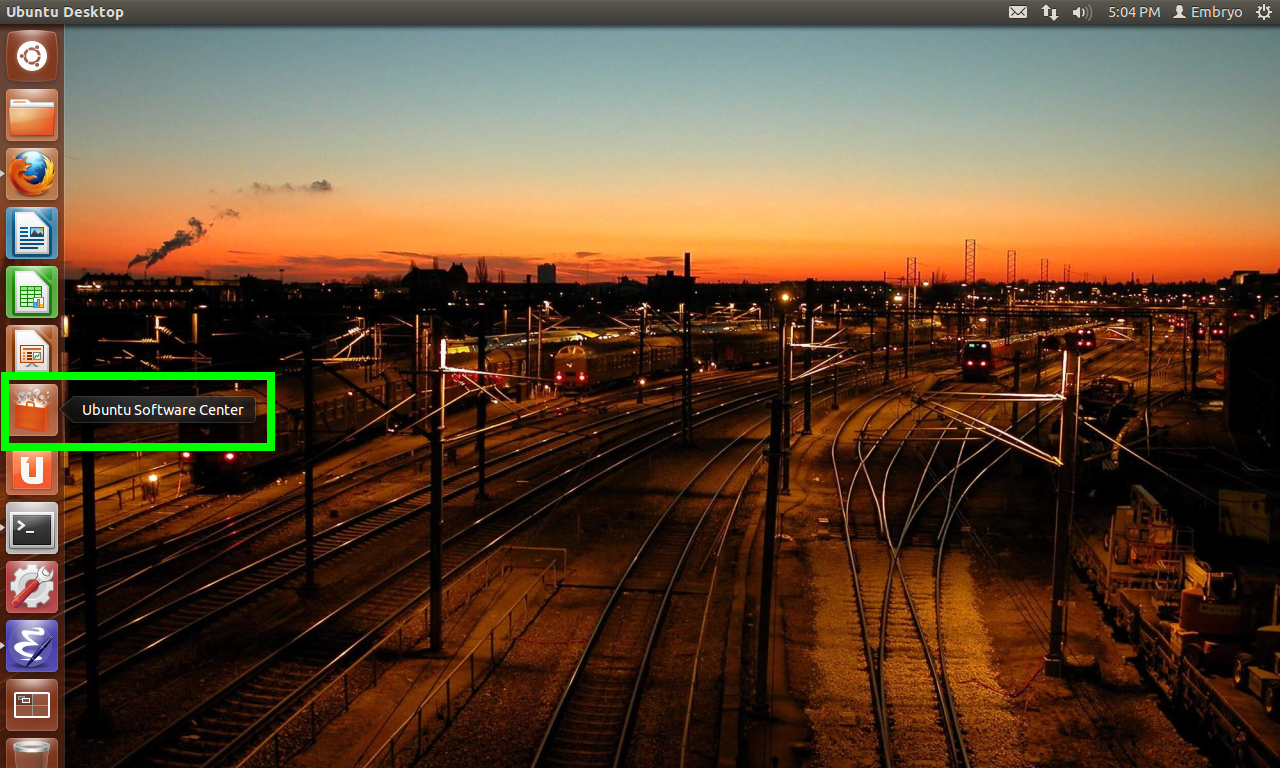
The Ubuntu Software Center (USC) is the official, recommended way of installing applications in Ubuntu. The USC is a graphical wrapper around low-level tools like APT or DPKG, so there is nothing you could do in USC that you couldn't do in command-line. However, a graphical interface is appealing to some, may be easier to use, and it may be more visible which packages are installed and which are not, mark software to be installed or undo choices you don't need anymore. Let's proceed and start up the Ubuntu Software Center.By default, the USC icon is located in the Unity bar on the left side of screen:
Alternatively, you can start it by pressing Alt+F2 to launch Dash, then type software-center followed by Enter. You can also launch it from a terminal typing the same thing, software-center.
Start it up and let's have a look at how it works.
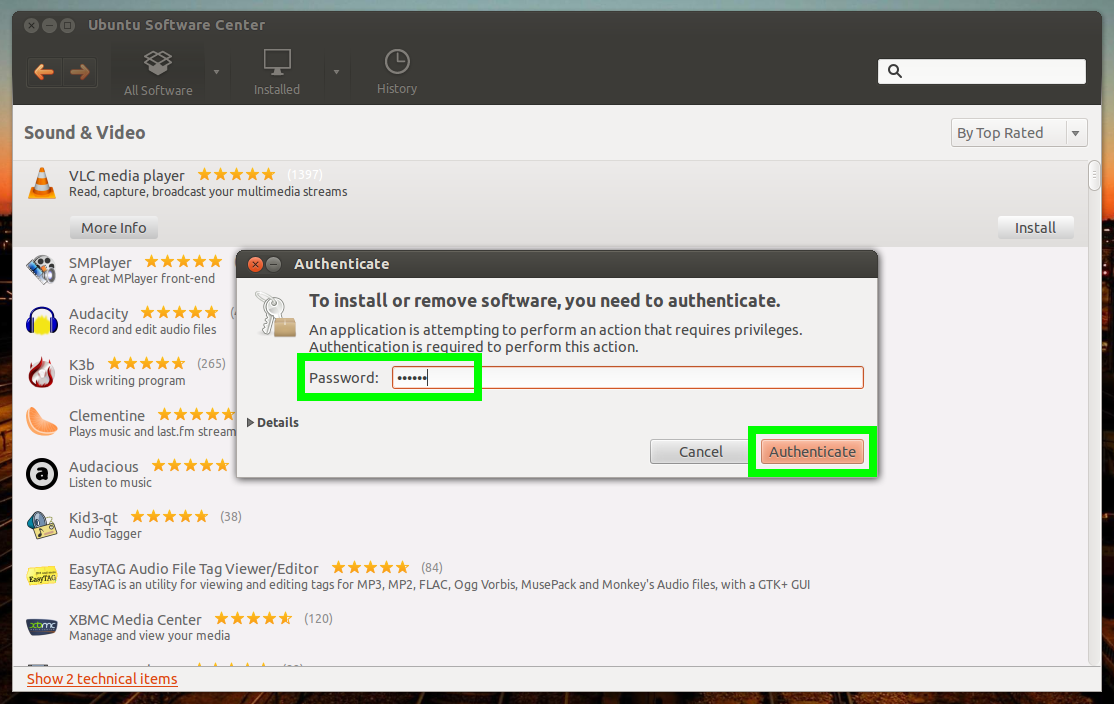
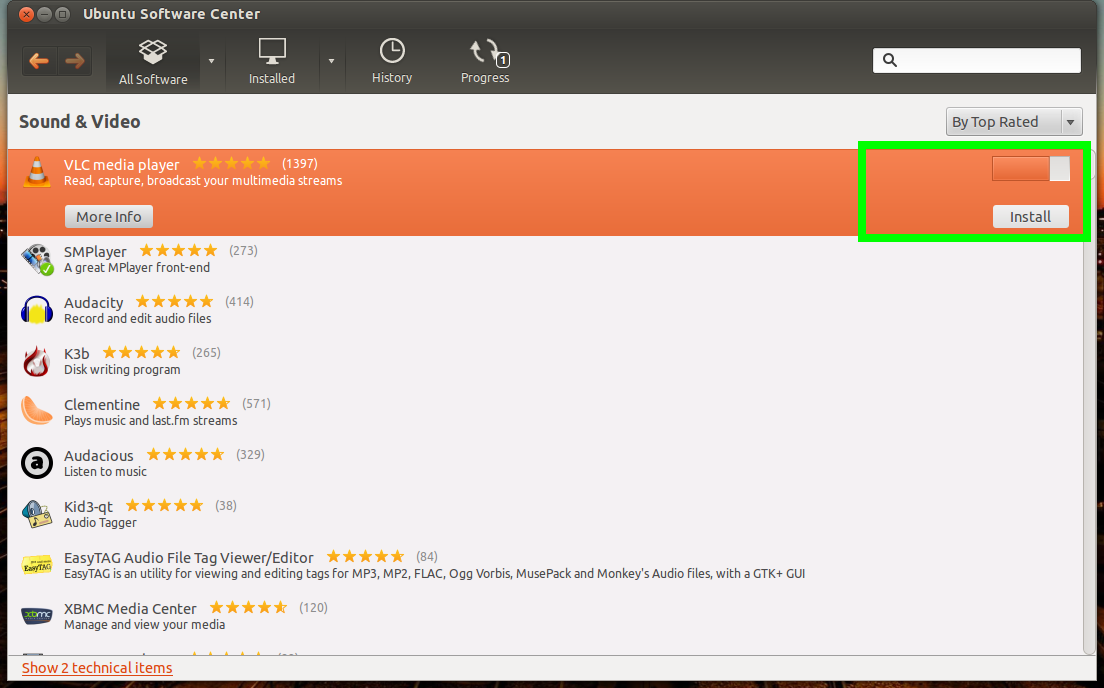
Let's say we want to install VLC, a full-fledged movie player. We can either search for vlc in the top-right Search box, or just click the Sound & Video section on the left sidebar:


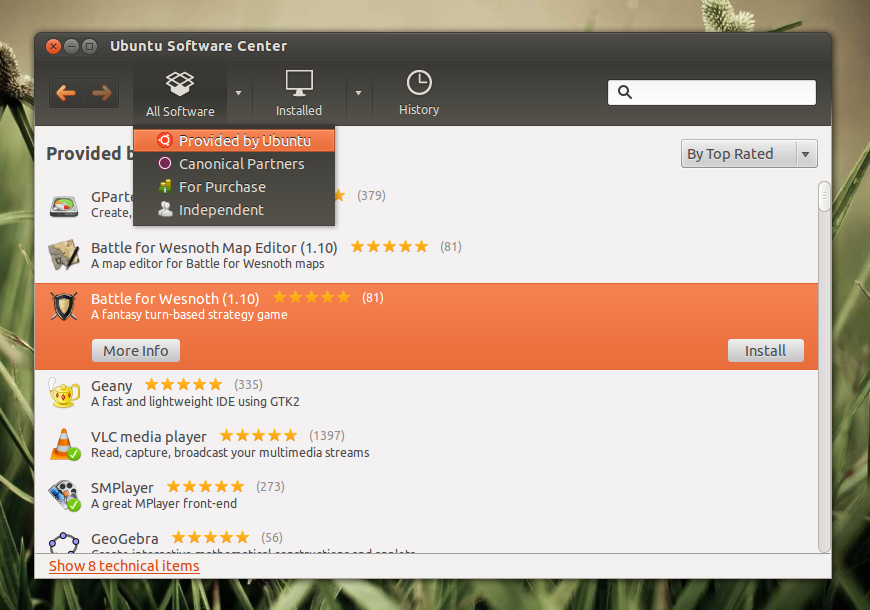
In USC you can also view installed software and a history of installed packages. Just click the Installed or History buttons on the top of the application. You can also choose, for instance, to show all the packages provided by Ubuntu, sorted by name or ratings, for example:
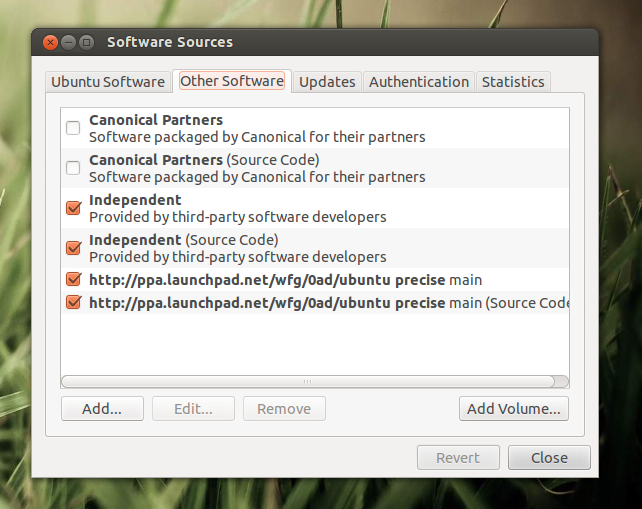
Another thing you can do in USC is adding additional repositories to your sources.list. Any changes done here can be done by manually editing the sources.list file with a text editor, like we did in the first part of this tutorial. Adding additional repositories will allow you to install software that is not included by default in Ubuntu's repositories, or install newer versions of applications. For this, to the Edit->Software Sources... menu, and click on the Other Software tab at the top of the window that appears. Then click on the Add... button and add some custom line, like for example deb http://ppa.launchpad.net/wfg/0ad/ubuntu precise main, which is the repository for the 0 A.D. game.

Installing Software Using Synaptic
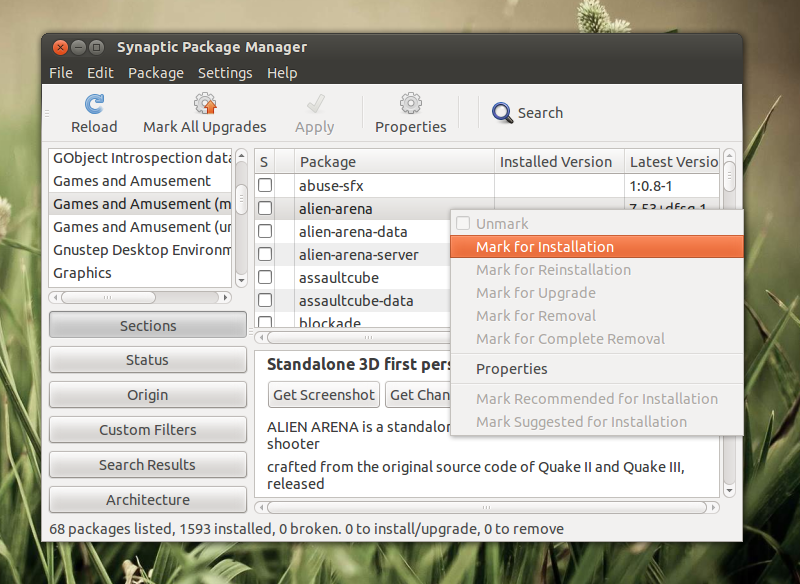
Synaptic is a powerful application for installing software, just like USC, but I find it to have more features than USC. If you want to try Synaptic, first install it (from USC, or open up a terminal and type sudo apt-get install synaptic). Here's how it looks like:
Installing Software in Kubuntu/Xubuntu/Lubuntu
Although this tutorial is about Ubuntu, all other flavors of Ubuntu have their own installation program, resembling more or less the Ubuntu Software Center. The way you can handle them is similar with the USC, I will not go into details. Just keep in mind they all use APT, so underneath their interface they all perform the same tasks (e.g. clicking Install to install a package will use sudo apt-get install).Installing Software Using the Command-Line
I explained most of this in the first part of this tutorial. Open a terminal (you can press Ctrl+Alt+T to do it, or launch it by pressing Alt+F2 and typing gnome-terminal followed by Enter. Basically, you will only need to use a few commands, which you have to write in your terminal:
sudo apt-get update
This will update your packages list. The next one will install package SMPlayer, a video player:
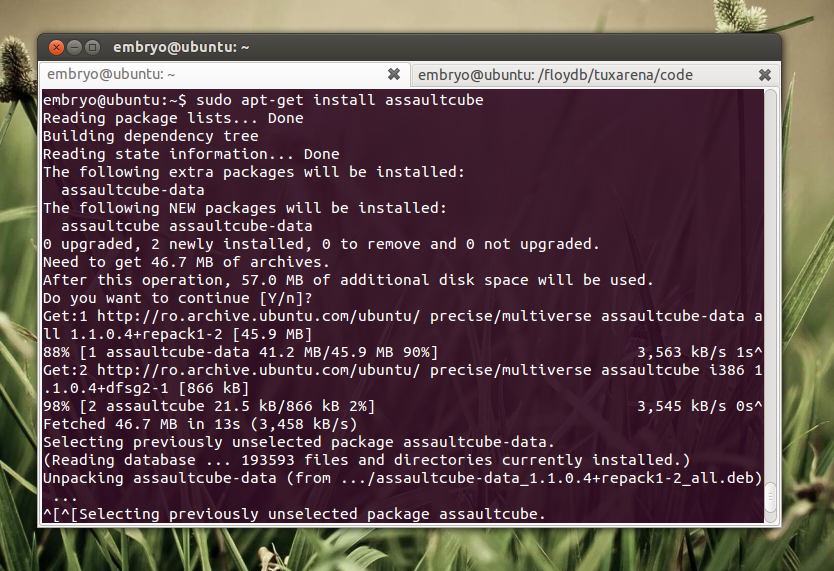
sudo apt-get install smplayer
Notice how package names are case-sensitive (smplayer, not SMPlayer), and how you need not specify the version or any other details. Dependencies will be fetched and installed automatically.
Installing Software from PPAs
A PPA (Personal Package Archive) is a repository which usually contains software not available in Ubuntu's default repositories, or newer versions of certain applications. There are hundreds of PPAs hosted at Launchpad.net. It is a simple way for various developers to integrate their applications in Ubuntu, or projects like GNOME, KDE or LibreOffice to provide packaged versions of their latest releases which will work with a certain Ubuntu release. The advantage of this is that PPAs will usually not break APT, and all packages installed this way fetch the needed dependencies automatically.There are several ways to add PPAs to your sources.list file:
- use USC or Synaptic to add these lines in a comfortable fashion (explained above)
- add PPA lines manually to your sources.list file using a text editor (explained in Part 1)
- use the apt-repository-add command in a terminal (explained in Part 1)
sudo add-apt-repository ppa:libreoffice/ppa
sudo apt-get update
sudo apt-get install libreoffice
deb http://ppa.launchpad.net/libreoffice/ppa/ubuntu precise main
deb-src http://ppa.launchpad.net/libreoffice/ppa/ubuntu precise main
Installing Software from Backports
Backports are similar to PPAs, and the Ubuntu backports are enabled by default in Precise. They offer newer versions of several applications on a specific Ubuntu release. Backports are enabled by default in 12.04 and 12.10, however if you miss them somehow you can add the following lines to your /etc/apt/sources.list:
deb http://ro.archive.ubuntu.com/ubuntu/ precise-backports main restricted universe multiverse
deb-src http://ro.archive.ubuntu.com/ubuntu/ precise-backports main restricted universe multiverse
Installing .deb Files
Files ending in .deb are Debian packages, the same packages Ubuntu uses. These can be installed manually using the dpkg command or your graphical installer.
Notice: In the older versions of dpkg, one should've installed manually all the needed dependencies when installing a .deb file, however now the package manager takes care of the dependencies too. Still, some .deb packages may not be compatible with your current Ubuntu release when it comes to additional needed libraries, so make sure you download a version built for your Ubuntu release (e.g. if you are using Ubuntu 12.10 Quantal Quetzal don't install a .deb package found somewhere on the Internet saying that it was built for 8.04, chances are the installation will fail.) If you run into problems, you can try fixing a broken package by typing in the terminal:
sudo apt-get -f install
Usually this won't be the case if you are careful downloading the right packages.
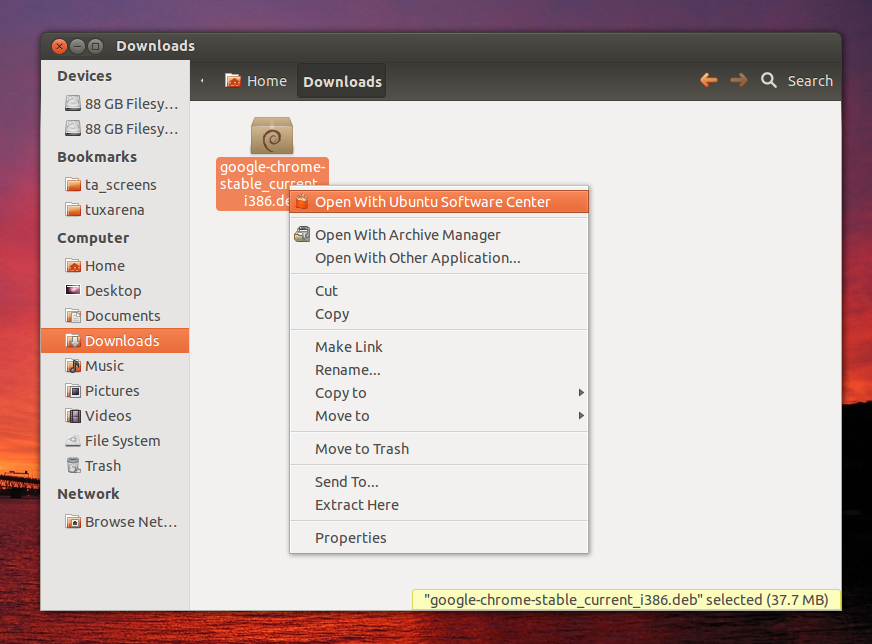
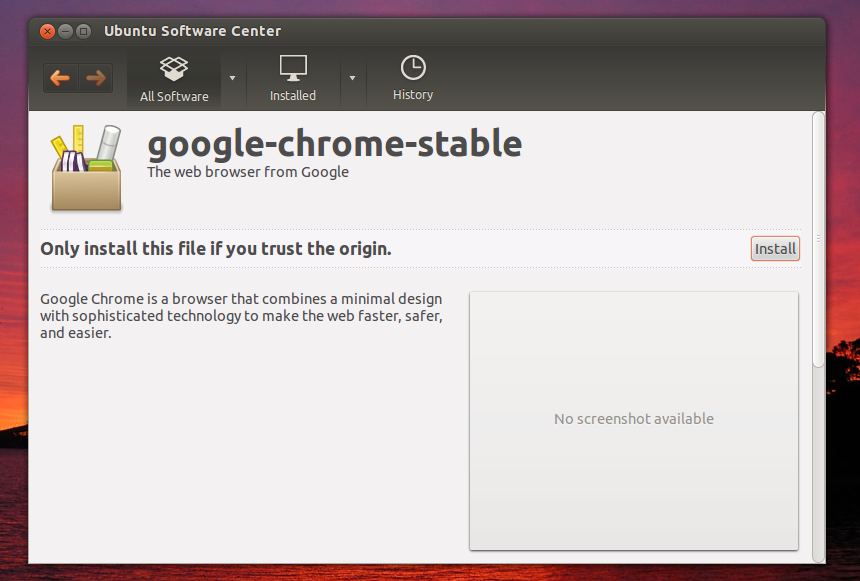
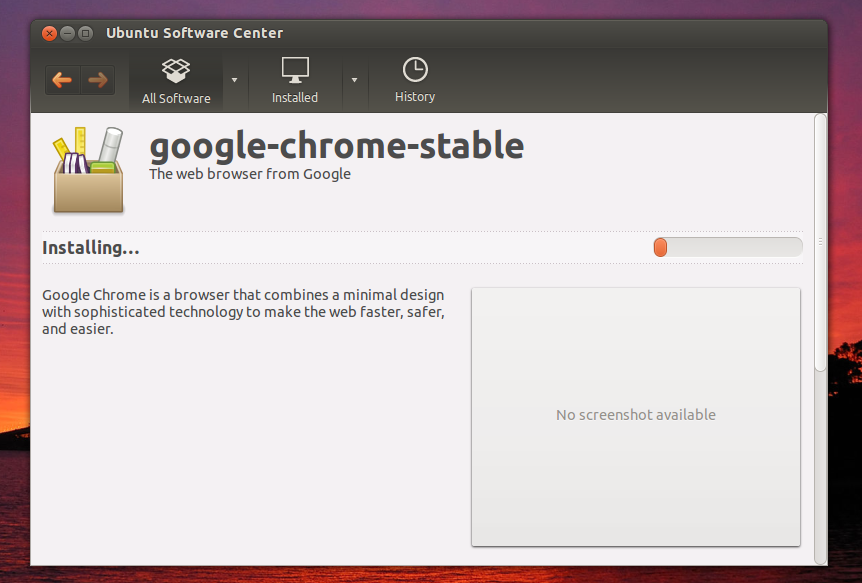
The Graphical Way
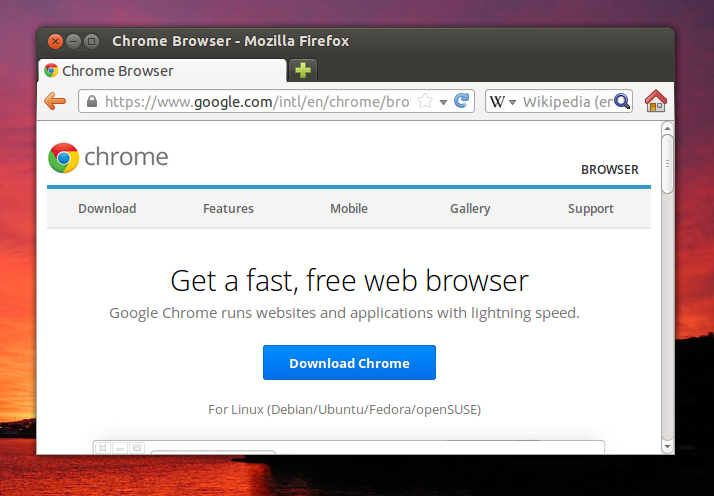
Download the .deb file somewhere on the hard drive. I will use the .deb for Google Chrome in this example:
The Command-Line Way
First, open a terminal (Ctrl+Alt+T), then navigate to where your file was downloaded. For example, if your file was downloaded in the Downloads directory inside your home, type:
cd ~/Downloads
Now, type the following command to install it:
sudo dpkg -i google-chrome-stable_current_i386.deb
Wait for the installation to finish. That's it.
Installing Programs with a Shell or Binary Installer (.sh, .run, .bundle etc)
Some programs offer an installation script or a binary installation file. These files can have various extensions or no extension at all. For example, games like ioQuake3 or Wolfenstein: Enemy Territory are packaged as .sh (Shell script) or .run files, VMWare may offer a file ending in .bundle, while other programs may come as binaries with no extension, like the installer of the game UrbanTerror, called UrTUpdater.i386.Since most of the time you will need root privileges to install software this way (not in all cases though), pay attention to where you get your installer from and if it is a trustworthy project or company. It's up to you not to run or install blindly any script which catches your attention.
To install these programs you will usually need to follow the steps below:
1. Open the terminal and navigate to the folder where your installer/binary file is
If your file is inside the Downloads directory in your home folder, do:
cd ~/Downloads
2. Make the file executableThis step is necessary, the program needs to have execute permissions in order to be ran:
chmod 755 program_name
Example:
chmod 755 Savage2-2.1.0.8-linux-installer.run
3. Run the programThe installer may need root privileges or not:
sudo ./Savage2-2.1.0.8-linux-installer.run
Notice the ./ preceding the program's name.
Let me explain a bit about permissions. Every program has permissions for user, group and others. These permissions can look something like this:
This means permissions are read and write for the USER, read for the GROUP, and read for OTHERS. By issuing the chmod 755 command we give the execute permissions to that respective file:
The same can be accomplished by issuing the chmod +x program_name command.
USER GROUP OTHERS
rw-  r--   r--
USER GROUP OTHERS
rwx   r-x   r-x
111   101   101
 7     5     5
Installing Programs from Archives (.tar.gz, .tar.bzip2, .zip etc)
These are archived packages which may contain either the source code or the binary files and additional files (documentation, license details, data) of a certain program. I will talk about sources in Part 3 of this tutorial - for now, after you uncompress the archive and see files like Makefile or src, chances are it's a source package and you need to compile and install it.To install such archives, open your file manager, extract the archive and then search for a file which may be the executable file. You may need to give permissions to execute.
Using alien to Install RPM Packages
This is likely to break your system, and as far as I know no longer needed. Pretty much everything is available now in native format, there is no need to use alien. Although not recommended, you can follow the instructions below to use it in case you want to install RPM packages.Alien is a program that converts .rpm files (files used by the package manager of Red Hat and Fedora) to .deb files. First, install alien (sudo apt-get install alien) and then run alien rpm_package.rpm. A .deb file will be generated, which you can install normally as explained above.