This guide is divided in four parts, so that you can jump to whichever you want using the links below:
What Is Wine?
Installing Wine in Ubuntu (Two Methods)
Starting Up and Configuring Wine
Customizing Wine
What Is Wine?
Installing Wine in Ubuntu (Two Methods)
Starting Up and Configuring Wine
Customizing Wine
What Is Wine?
Wine is a compatibility layer which allows Windows applications
to run on Linux by translating Windows system calls into native Linux calls.
Wine runs successfully a variety of Windows applications and games on Linux - the official website offers an
application database which organizes
those depending on how well they perform under Wine, known issues and solutions, screenshots and
helpful comments.
You should give Wine a try if you have some Windows-only game or application that you really need and want to be able to use Linux for it.
You should give Wine a try if you have some Windows-only game or application that you really need and want to be able to use Linux for it.
Installing Wine in Ubuntu (Two Methods)
I will approach two different ways of installing the latest Wine release in Ubuntu: using the
Wine PPA and compiling from source.
Using the Wine PPA
This method is pretty straightforward. First, we need to make sure that we uninstall any older version of Wine:
Now, let's add the
Wine PPA repository to our sources.list file:
Finally, update the package lists and install Wine:
This should be all.
Compiling Wine from source
This is usually not needed considering there is an updated repository available, but sometimes the PPA repository may have a delay until the packages are built and uploaded. Usually this happens immediately after a new version of Wine is released and there are no updated packages in the PPA. This is where compiling Wine from source could come in handy. Also, Ubuntu 10.10 Maverick Meerkat comes with the latest stable release of Wine, which is 1.2, so if you want the latest development release you will need to install it from the PPA or compile it from source.
First, make sure you have the sources repositories enabled, meaning a line that starts with deb-src is in your /etc/apt/sources.list file, like the following:
If not, add it and save the file. Also, make sure to replace maverick with your actual Ubuntu version.
Sources are enabled by default in Ubuntu, so you will probably need to do nothing at this step, unless
you commented or deleted this line yourself.
Next, let's install the compilation tools, the needed development libraries and additional Wine dependencies:
The first command will fetch the needed development libraries needed by Wine, together with the compilation
tools like gcc. The second one will install two additional development libraries.
Now, download the source tarball from the
official website (direct link
here), and then
uncompress it by typing in a terminal (don't forget to make sure the current working directory is the one where
you saved the tarball):
I used the latest version available at the time of writing, but replace the version number accordingly if it
differs.
Next, enter in wine-1.3.9 directory and issue the following commands to compile and install it:
This will take a while, but in the end Wine should be properly installed. Alternately, you can specify
a different installation prefix from the default, e.g.:
In this case Wine will use /home/USER/usr (replace USER with your actual username) as the installation
prefix, and you can issue make install as normal user, without the need of sudo. Notice that in this
example Wine would install inside /home/USER/usr/bin/wine, so if you specify a different prefix don't
forget to include the path to the Wine binary in your $PATH. Also notice that for older versions of Wine
the commands needed to compile it should be ./configure; make depend && make; sudo make install.
If you need to uninstall Wine, issue the following command from within the wine-1.3.9 directory:
Using the Wine PPA
This method is pretty straightforward. First, we need to make sure that we uninstall any older version of Wine:
sudo apt-get remove --purge wine
sudo add-apt-repository ppa:ubuntu-wine/ppa
sudo apt-get update
sudo apt-get install wine
Compiling Wine from source
This is usually not needed considering there is an updated repository available, but sometimes the PPA repository may have a delay until the packages are built and uploaded. Usually this happens immediately after a new version of Wine is released and there are no updated packages in the PPA. This is where compiling Wine from source could come in handy. Also, Ubuntu 10.10 Maverick Meerkat comes with the latest stable release of Wine, which is 1.2, so if you want the latest development release you will need to install it from the PPA or compile it from source.
First, make sure you have the sources repositories enabled, meaning a line that starts with deb-src is in your /etc/apt/sources.list file, like the following:
deb-src http://ro.archive.ubuntu.com/ubuntu/ maverick universe multiverse
Next, let's install the compilation tools, the needed development libraries and additional Wine dependencies:
sudo apt-get build-dep wine
sudo apt-get install libgsm1-dev libmpg123-dev
tar -xjf wine-1.3.9.tar.bz2
Next, enter in wine-1.3.9 directory and issue the following commands to compile and install it:
./configure
make
sudo make install
./configure --prefix=/home/USER/usr
If you need to uninstall Wine, issue the following command from within the wine-1.3.9 directory:
sudo make uninstall
Configuring Wine
Winecfg
winecfg is used to configure Wine and change settings like sound, graphics, Windows version and so on. Wine uses the winecfg utility for configuration, which you can start either by typing winecfg in a terminal or pressing Alt+F2 and typing it there, followed by Enter. Note that the default settings usually will do, so it's not necessary to change the configuration options after installing Wine. When it starts for the first time, winecfg will prompt you to install Gecko, a web rendering engine used to embed HTML in applications (the same engine which is used by Firefox). It is recommended that you install it.
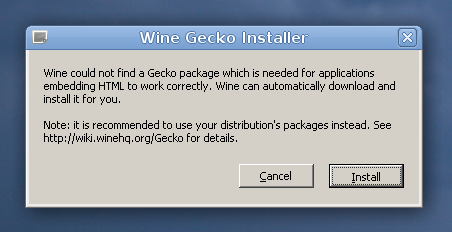
If you don't install Gecko now, you'll be prompted later when it is needed by some application or you will be able to install it manually using the winetricks script (which is explained below this section). After installing Gecko, let's have a look at the Wine configuration window:
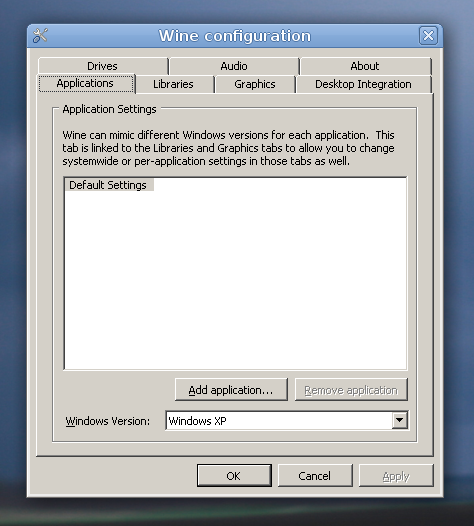
I'll briefly explain each tab:
Winetricks
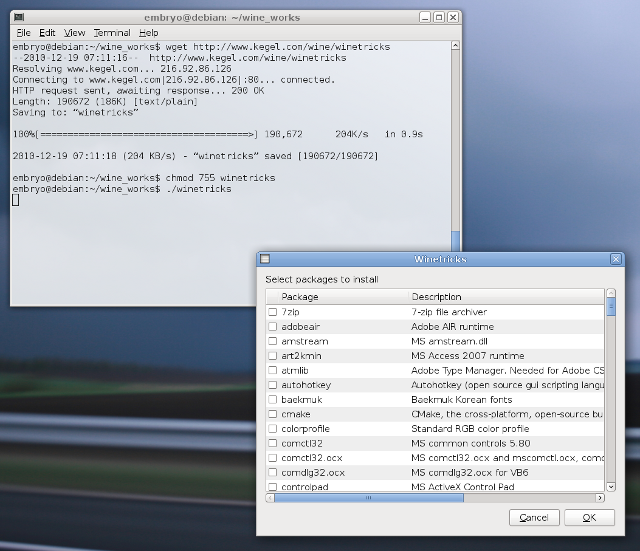
Winetricks is a powerful script which automates installation of various useful packages, offering a friendly interface to do so. Before downloading and using winetricks, first let's install the cabextract package, which is a native Linux application that extracts Microsoft Cabinet files (CAB), and is available in the repositories:
Now let's fetch the script:
Now make it executable and run it (make sure you're in the same directory from which you issued the
wget command):
A window with a list of packages to be installed will appear. As a side note, you can also specify
the packages to be installed at the command-line, as parameters for winetricks, e.g.:
Choose from the list the packages you want to install. I usually install here corefonts, d3dx9,
gecko, mfc42, riched30 and tahoma. Notice that these are needed by some applications I run through Wine,
but your needs may (and will) vary. Refer to the
AppDB section on the Wine homepage to see individual requirements
for each game or application. In addition to installing various applications, winetricks will also allow
you to configure several settings which will be changed just like you would change them in winecfg (sound
options, Windows version, virtual screen resolution and so on). After choosing the desired packages click
OK and wait for winetricks to fetch and install them.
Editing the registry
There are several games which require some tweaking which can be done by using the regedit utility and adding certain keys.
More tricks
This is a matter of personal preferences, but I used to have two or more .wine configuration directories and to switch (rename) between them depending on which application I'd need. So if I had several applications which require certain settings and others which do not function properly with those, I'd group the applications in a .wine configuration directory, and the others in another, and switch between them.
winecfg is used to configure Wine and change settings like sound, graphics, Windows version and so on. Wine uses the winecfg utility for configuration, which you can start either by typing winecfg in a terminal or pressing Alt+F2 and typing it there, followed by Enter. Note that the default settings usually will do, so it's not necessary to change the configuration options after installing Wine. When it starts for the first time, winecfg will prompt you to install Gecko, a web rendering engine used to embed HTML in applications (the same engine which is used by Firefox). It is recommended that you install it.

If you don't install Gecko now, you'll be prompted later when it is needed by some application or you will be able to install it manually using the winetricks script (which is explained below this section). After installing Gecko, let's have a look at the Wine configuration window:

I'll briefly explain each tab:
- Applications tab: this is used to set different Windows versions for different applications. The default (Windows XP) should be fine for most of them.
- Libraries tab: here you can add dynamic link libraries (DLLs) and specify whether they should be a Wine builtin or a native Windows binary; this will be used to copy various libraries needed by certain games or applications to run properly.
- Graphics tab: in this tab you can specify graphics settings, emulate a virtual desktop and choose its resolution, change Direct3D vertex shader options and set fonts dots per inch (DPI).
- Desktop Integration tab: in this tab you will be able to change the look of Windows applications that run through Wine, and also to change the theme which it uses (this is explained below in the section Customizing Wine).
- Drives tab: this tab allows you to set drive mappings, which will give Wine access to certain devices and drives on your system. Default is usually fine, but you may need to add an optical drive here for applications which require the CD or DVD.
- Audio tab: the first time you click on this tab a message window will appear notifying you that a recommended driver has been selected. Click OK, then in the Audio tab click Apply. You can also test the sound using the Test Sound button. Default settings should be fine.
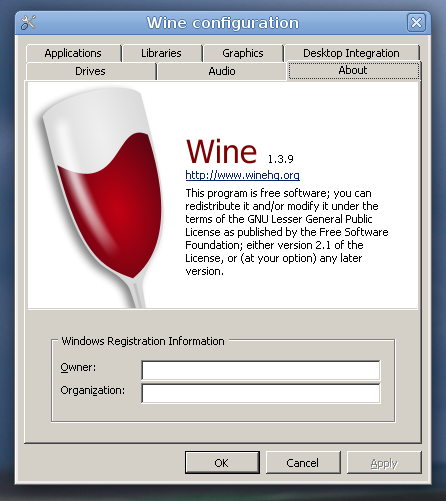
- About tab: optionally you can fill in the Owner and Organization text fields (anything will do).

Winetricks
Winetricks is a powerful script which automates installation of various useful packages, offering a friendly interface to do so. Before downloading and using winetricks, first let's install the cabextract package, which is a native Linux application that extracts Microsoft Cabinet files (CAB), and is available in the repositories:
sudo apt-get install cabextract
wget http://www.kegel.com/wine/winetricks
chmod 755 winetricks
./winetricks
./winetricks d3dx9 corefonts mfc42 riched30 tahoma

Editing the registry
There are several games which require some tweaking which can be done by using the regedit utility and adding certain keys.
More tricks
This is a matter of personal preferences, but I used to have two or more .wine configuration directories and to switch (rename) between them depending on which application I'd need. So if I had several applications which require certain settings and others which do not function properly with those, I'd group the applications in a .wine configuration directory, and the others in another, and switch between them.
Customizing Wine
In this part we'll focus on changing the look of applications which run through Wine by changing the
theme that Wine uses by default. First we will need to make sure that the unzip utility is installed:
The next step is to download an MS style and one of the places where you can find MS styles is
deviantART.
Here is a search query for the term
'msstyles', you can choose any style from the list. I will use
VistaPerfection X4 for this example. Save your style in a location of your choice and unzip it. For my example
I will first have to unzip the VistaPerfection_X4_Msstyles_by_kayeirene.zip file and then also unzip a second
zip file resulted from the first one:
The VistaPerfection.msstyles file will be located inside the VistaPerfection folder. Now
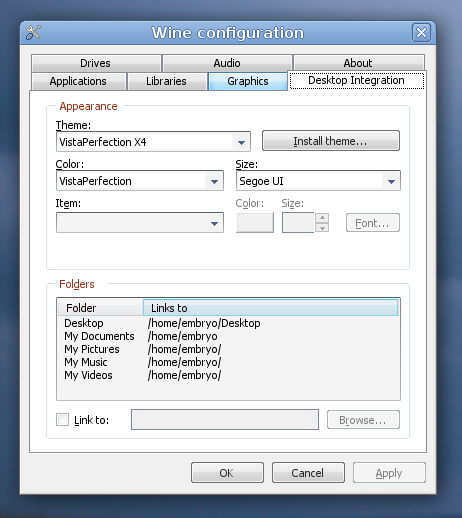
fire up winecfg and go to the Desktop Integration tab. Click the Install theme... button, navigate
to the place where your VistaPerfection.msstyles file is located and select it. Next, select the VistaPerfection X4
style in the drop-down list called Theme (under the Appearance frame). Hit the Apply button and restart winecfg
to see the changes. That's all. Here's how this theme looks like:
I hope this guide covered some of the basics for running Wine. If you need more help, you can refer to the following sources:
sudo apt-get install unzip
unzip VistaPerfection_X4_Msstyles_by_kayeirene.zip
unzip VPX4forLSPatched.zip

I hope this guide covered some of the basics for running Wine. If you need more help, you can refer to the following sources:
- Wine AppDB - usually all the info you need to run specific games or applications
- Wine Wiki - official Wine FAQ, official documentation
- Wine Forums - official Wine forums